
Solar panels have benefited many companies, households, and business sectors in lowering their energy bills. It is estimated that there are at least 92.7 billion solar panels installed in the world today.
However, everything about solar panels may appear intimidating to inexperienced users. You may have wondered at times: “Is my solar panel system up and running? Is it working at peak performance?”.
Fortunately, you can now check whether or not your solar panel is running effectively like an expert with just a few easy steps.
The Basics of Solar Panels
There are two types of electric current used by people around the world. The first one is alternating current (AC) and the second one is direct current (DC).
In this context, solar panels employ direct current (DC), which means current travels in only one way and is suitable for low voltage applications. You should measure the wattage and voltage of the solar panel first to know whether it is working efficiently. This is especially the case for panels sitting on top of your brand new home.
This also helps to calculate how much electricity is leaking. The details regarding the wattage and voltage are normally put on the backside of the panel.
How to Test Solar Panels Like A Pro
To test your solar panel, you will need a multimeter. This is a portable instrument used to measure wattage, amperage, and other electrical measurements. The most common version of a multimeter today is a digital multimeter, which is more modern than the analog version.
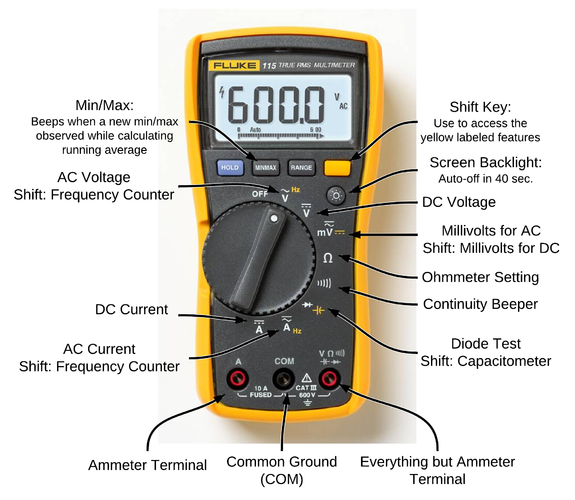
Before we move any further, keep in mind that improper use of the multimeter might cause harm to your solar panels. So, you must pay close attention to the directions and details provided below.
Step 1: Find the Converter Box
The converter box is usually located at the back of your solar panel. You now need to remove the cover so that you can see what is within the converter box. Inside the box, you will find cables and connections.
Step 2: Locate the Positive and Negative Connections
Look for both positive and negative connections. After you’ve located the connections, make sure your solar panel is getting enough sunshine. You may tilt the panel till it gets maximum sunlight exposure.
Step 3: Set the Multimeter to DC Current
Make sure you’re measuring at the appropriate voltage level for a solar panel. This means that you should set the multimeter to a bigger voltage than your panel is rated for. This way, you will be assured that your measurements are precise.
Step 4: Connect the Alligator Clips
Connect the positive connection with the red alligator clip and the negative connection with the black alligator clip. The multimeter will then provide you with a reading indicating the production of your solar panel system. Like this:
Step 5: Test the Solar Panel
The most often used volt rating for solar panels is 12-volt. Before you begin, make sure that the meter is set at 200 volts DC. You will get a valid reading if you have completed all of the steps correctly.
Newer solar panels will often provide stronger figures. They should generate a voltage that is close to the permitted value. You can disconnect the alligator clips after you have turned off the multimeter.
You may need to test the charge controller while checking the solar panels. The controller helps to regulate the voltage or current from solar cells in order to protect the storage system from being overcharged.
Conclusion
Congratulations, you now know how to test your solar panel. Checking the performance of your solar panels is a critical skill that will spare you the hassle of dealing with non-functional panels. You must be able to monitor and optimize the efficiency of your solar panel system from time to time in order to get the most out of your photovoltaic output.